|
|
HOW TO BUILD A SIMPLE SLUICEMaterials(If you can't get wood, try cardboard... but don't use it with water!)
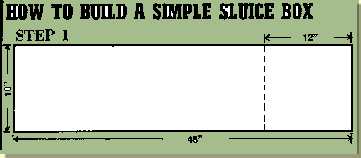
Step 1Saw a 12" piece off the four-foot 1" x 10" board. This
gives you a 3 foot section for the bottom of the main box
and a 1 foot section for the holding tray.
Step 2Using the two pieces of the three-foot long 1"x8" boards,
make the measurements and cut as shown in the illustration.
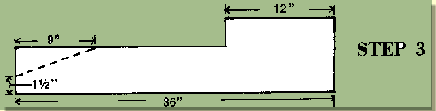
Step 3Measure 9" from the narrow end, and 1.5" from the bottom.
Draw the angle and cut according to the diargram.
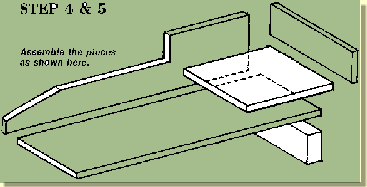
Step 4Nail the two sides to the outer edge of the botton
section (the 3-foot 1"x10"). Then nail the eleven-inch 2" x
4" to the bottom rear of the unit.
Step 5The holding tray is then intalled by positioning the one-foot piece of 1" x 10" (cut from the four-foot bottom in step 1) and nailing it in place. A piece of eleven-inch 1" x 4" is then cut and nailed across the opening on the back to enclose the holding tray on three sides. Step 6The riffle tray is constructed with the two twenty-two inch 1" x 1" boards. These are positioned in the main box, taking care to allow a slight space for water expansion. The distance is then measured to the outside edges of the parallel strips and two pieces of molding (0.75" x 0.25") are cut and nailed at either end. Then remove the riffle frame and install the remaining riffles between the tow on the ends. They should be placed about one-and-one-eigth inches apart. Step 7The indoor-outdoor carpet is then fitted into the bottom of the sluice box. This will trap the fine gold that would otherwise escape. Step 8The riffle tray is then re-positioned in the sluice box over the carpet. Four 0.25" diameter holes are then drilled through the 1" x 1" rails on the riffle tray, through the carpeting and the bottom of the sluice box. You then install the bolts and tighten them down (wing nuts will make it easier to disassemble.) Now that you've built it, here is how it works...To operate a sluice, gold-bearing gravel is shovelled into the channel. A stream of water flows continuously through this gravel, washing and decomposing it. The lighter material is then carried away, while the gold and other heavy concentrates are trapped in the spaces formed between the riffles, the gold always sinking through the lighter material to the bottom. The steeper the incline, the quicker the material is washed away by the force of the water; the tougher the dirt, the steeper must be the grade, as tough clay naturally does not break up as quickly in a slow current as in a rapid one. In short sluices, therefore, the incline should be relatively slight, as there is more danger of losing fine gold in a short sluice than in a long one. Some sluices begin with a steep descent, then almost level off towards the end. This effectively washes and disintegrates the toughest material, then allows the gold to sink as the water slows near the end. It should be remembered while sluicing that, generally, about 80 percent of the gold is caught in the first 200 feet. Sluice boxes employ the use of various types of riffles. The plank riffles illustrated in the top drawing can be effectively replaced by logs. These are often readily available at the site, resulting in less material having to be transported to your workings. When rocks are plentiful in the gravel you're washing, it is wise to place a small bar across the end of each trough to prevent the riffles and the bottom of the sluice from being run bare. Find out more
about riffles ...
|